
So, with a bit of playing around I have my LaunchPad blinking happily and I am going to show you how I did it. People who really know there stuff might not like how I’m doing this, but we will progress to creating our own project from scratch soon.
Before we start I’m going to say right now the demo temperature sensing program TI provides is hard to work with when starting an example project. It’s cool since it shows off what the chip can do, but it's hard to work modify. Also, I will be using Code Composer Studio because it has a larger program size limit that IAR. This doesn't matter with the current chip, but it will for others I will use in future posts.
Step 1 – Installation and Example Code
Download and install Code Composer Studio. If you are using Windows 7 like I am make sure you don’t install it under Program Files, and install it somewhere like “C:\Texas Instruments”. Also, you probably don’t need to do this, but I kept my LaunchPad unplugged while I was installing everything.
Download the test project “MSP-EXP430G2-Launchpad” and unzip it to a temporary folder such as one on your desktop.
Download the “MSP430F20xx, G2x01, G2x11, G2x21, G2x31 Code Examples” and also unzip it to your documents somewhere. This is the sample code we will be using, and not the example project with the stupid temperature sensing UART thing.
If my links don't work, all of this is linked under the LaunchPad Wiki.
Step 2 – Load the Project and Set it Up
Run CCS and you will be prompted where you want to put your workspace. Within one workspace you can have multiple projects so I recommend making a directory where you will keep all your different projects code. I chose to use this directory as default but you don’t have to.
Close the Welcome window.
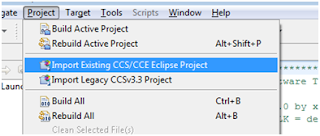
Now we are going to import the project. Go to Project --> Import Existing CCS/CCE Eclipse Project.
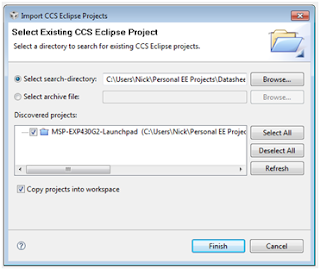
The MSP-EXP430G2-Launchpad project will show up, check the “Copy projects into workspace” and then click Finish.
On the left under the project box expand your project, and you’re going to want to delete “test_RX.c.old”. We won't be using it.
Double click on the file “MSP430F2012.ccxml”. This is the file which lets the compiler know which devices your project is being loaded on to. Click “Do not show this again” on the stupid Cheat Sheet thing on the right that popped up.
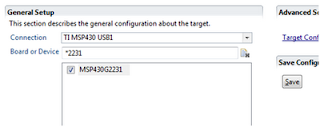
Type “*2231” in under the Board or Device, and then check the MSP430G2231. There is a chance that you might not need to do this, but I am a fan of selecting your device just in case, just one less thing to worry about being wrong. Again, I have no idea why they had this chip selected. I assume that you are using the chip that came plugged into your LaunchPad for now. In later tutorials we will be changing this to program different chips using the SBW. Click “Save Configuration”.
To keep ourselves sane, rename the .ccxml file according to “MSP430G2231”.
Now go to Project, and hit “Clean…”. I like to do this when I make any huge property changes, again this might not be necessary but follow me for now. A warning will pop up, continue to clean the project.
Step 3 – Use the Real Test Program
Open up main.c, you will now see a huge program that’s poorly commented. I’m still young, and hate commenting my code, but everyone should suck it up and do it. That is one of the most important things I feel everyone must do when writing code, comment well.
Under the code examples we downloaded before, under the folder named “C” there should be a file named “msp430x20x3_1.c”. Open this file in notepad or whatever editor you use. Copy all the code. Then past it into our main.c file after removing all the stupid temperature project code.
The comments at the start of the code should look like this. (My formatting is all messed up, I know. I just wanted to post this quickly, I can edit the fonts later.)
//******************************************************************************
// MSP430F20xx Demo - Software Toggle P1.0
//
// Description; Toggle P1.0 by xor'ing P1.0 inside of a software loop.
// ACLK = n/a, MCLK = SMCLK = default DCO
//
// MSP430F20xx
// -----------------
// /|\| XIN|-
// | | |
// --|RST XOUT|-
// | |
// | P1.0|-->LED
//
// M.Buccini / L. Westlund
// Texas Instruments, Inc
// October 2005
// Built with CCE Version: 3.2.0 and IAR Embedded Workbench Version: 3.40A
//******************************************************************************
This code is very nice and simple and is pretty well commented. What it does is toggle P1.0 which in this scenario, will blink an LED on the LaunchPad.
One thing we will need to change (which again, we might not have to, but I like to keep these things as correct as possible) is the #include header file.
Change it to this:
#include "msp430g2231.h"
Step 4 – Programming the LaunchPad
Now we are going to program the LaunchPad, but before we do I have a few comments. It seems like the pictures and schematics they provide on the LaunchPad Wiki site are a bit wrong. P1.0 is connected LED 1, which is Red. This is the LED we will be toggling. If it is green on your board, or anything else is funky or different, please post and let me know.
We now should plug in the LaunchPad, hopefully all your drivers install automatically because mine did. If you are using Windows XP I think you have to direct the installer to the files under the CCS install directory. Good luck.
The LaunchPad should have at the very least the power LED lit showing the device is powered and ready to go, you might have some blinking LEDs or something from what is already stored on there.
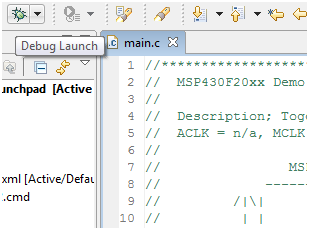
Click the little bug near the project menu called “Debug Launch”. A window should pop up which is compiling your code, and then a debug session should open up. If you have any errors either something is wrong with your driver, you didn’t follow my instructions correctly, or something else entirely. If you are having trouble, feel free to comment.
Nothing should be happening on the board yet though. What we want to do is now click Run, which will start the program on the LaunchPad. Now look down at the LED.
Congratulations, you have a blinking “Hello World” program working!
Step 5 – Modify and Have fun
Change the “i” value in the code to change how quickly the LED blinks, the bigger the number the longer the LED will stay on and off. You can also change the port to P1.6 to blink the other LED. Next blog post I will explain the code, and fun ways to modify it.
As always, comment away. If I have typos, formatting errors, or some wrong information please let me know. Hopefully this worked for you and I hope you’re now having fun with your LaunchPad.
-NJC
As a Windows 7 user that installed to `Program Files (x86)`, I can say that it was not a good idea. I'm pretty sure it made installation more difficult and at this point I am unable to uninstall it (get an error each time).
ReplyDeleteAlso, I followed TI's guide with no luck, which may or may not have been related to my poor choice of installation directory. However, I'll be trying out this guide and hopefully I won't need to uninstall it!
Interesting... I installed to the Program Files (x86) directory and everything works fine, as far as I know. What exactly is supposed to be the problem for it?
ReplyDeleteI installed on on XP with no problems, ran the program in debug and it worked right off. I'll try it tonight on Vista and see how it goes.
ReplyDeleteQudos for gettig this up. Now to see what I can do with it.
I installed it, checking every single option, as I didn't know which ones I actually needed. MSP430 was missing from the 'Project Type' list, and the only option was C2000. I believe this is when I first tried to uninstall it, only to receive an error.
ReplyDeleteI re-ran the CCS installation, and it tried to repair my installation. I watched everything install again, and noticed the box next to MSP430-something was unchecked yet disabled. I went to the original package I downloaded and found 2 separate installation files with MSP430 in their name. One of the files had 'CGT' in the name. I installed both. No luck.
I went into CCS and installed all the updates it could find. No luck.
At this point, I've uninstalled several of the components that came with it. I was hoping that might help me get the main uninstaller working (it didn't).
IAR is now working fine, however, and it's much more lightweight. I might try to uproot/remove CCS manually and reinstall it.
I think the problem with installing it in the Program Files directory is that you need Administrator access for the directory. Who knows if thats important or not for CCS, but I've used other programs that get mad when you install in Program Files, such as MATLAB.
ReplyDeleteI did just notice that my installation is a little earlier. I have CCS 4.1.2, and currently TI is downloading 4.1.3. There may be a bug in the newer version that causes this. I have administrator privileges, though, so maybe that's the issue. I just found out this morning that my LaunchPad has been shipped, and should be here on Monday. I've gone ahead and finished off the intro tutorial on my blog, though, with a little different view on using CCS and the debugger.
ReplyDeletePerhaps, but there was a warning during the install saying it's best to turn off User Account Control (UAC) and (maybe I'm making this up) to not install in the x86 folder. I didn't do either. I have Admin privileges and have tried running CCS under Admin, but no luck.
ReplyDelete4.1.3 was the version I installed, and it was straight off their wiki. I'm not too concerned at this point, though; I've come to really hate the bloatedness of Eclipse (even though I have to use it on a daily basis). IAR reminds me of Notepad++ in all the best ways.
Thanks for writing this blog. I have no idea about electronics, just programming, and am trying to teach myself electronics. The launchpad comes with next to no documentation, the IAR compiler thing simply freezes for me, and I wasn't sure how to use CCS. Now I have a blinking red LED. Step one is a success, and that is mostly thanks to you :)
ReplyDelete@Anonymous
ReplyDeleteI had the same issue with IAR; if you followed TI's guide, there is one step they left out, and that was to set Project > Options > General Options > Target > Device.
Thank you so much for the feedback and the comments guys. I'm really glad that this is helping a few people. Without your posts its hard to get motivation to keep writing. Just wanted to than you guys for supporting me.
ReplyDeleteLet me know if theres anything you want me to write about in particular that you might be having trouble with.
Thanks again guys. :-)
Worked like a charm on win 7 x64
ReplyDeleteThanks for the inspiration! I ended up using the IAR workbench because my PC is memory-challenged, but this looks like a nicely done write-up. Keep the info coming! I just got my LaunchPad and am relying heavily on your site to come up to speed. Thanks --Michael (bot-thoughts.blogspot.com)
ReplyDeleteI could not able to get the msp430g2231 device in ccs ver4 wat to do???
ReplyDeleteThanks! I'm learning how to use the Launchpad and this tutorial was just what I needed to get started. TI's tutorial is rather, um, "uninformative" and because I'm transitioning from Arduino this is really helpful. Thanks again!
ReplyDeleteHey,...i dont have the launchpad yet,but have a question... is the logic level 5v or 3.3v ?
ReplyDeleteThe logic level is 3.3v
ReplyDeleteVery good Get started worked for me ;)
ReplyDeleteThis comment has been removed by the author.
ReplyDeletei managed to download the code with the ccs but there is no run button after the debugging so i have to disconnect the usb to see the results of the code any help ?? thanks
ReplyDeletep.s. amazing site really helpful i just got mine and i m trying to make it work
Thanks for your guide. Win7, installdir is in system root.
ReplyDeleteCode Composer Studio Core Edition
Version: 4.2.1.00004
Severity and Description Path Resource Location Creation Time Id
This project was created using a version of Code Generation tools that is not currently installed: 3.2.2 [MSP430]. Please install the Code Generation tools of this version, or migrate the project to one of the supported versions. MSP-EXP430G2-Launchpad properties 1295702616355 5
Multiple Errors have occured
Asynchronous viewer update (Detail: "Error")
In cheat sheet dock "Terminate Debug Session" I cannot click on "do not show this again".
Error initializing emulator:
A firmware update is required for the USB debug interface.
Click the "Update" button to update the firmware and launch your debug session.
Error initializing emulator:
Only one MSP430 device can be accessed at a time per each CCS process. Please start another instance of CCS for accessing the second FET, or reconfigure your Target Configuration file.
But it seems to get flashed allright.
Mhh. Can't run the program via debugger.
Solved:
ReplyDeletehttp://e2e.ti.com/support/development_tools/code_composer_studio/f/81/t/73131.aspx
And open Debug view under: View>Debug
hi NJC, that was an awesome tutorial and we got our LED blinking. But the question is how do we terminate the program. In CCS, the example tutorial says that clicking "Terminate All" would do but our LED didnt stop blinking till now :) :( ..
ReplyDeleteAlso, can we change the contents on P1IN register via C code? Where can we get the register descriptions of the board?
Your help will be appreciated..
Hello! You can stop the program by either pressing the reset button or taking the power off. All the stop button does in CSS is end the debug session.
ReplyDeleteFor the P1IN, you can only read from these registers as they are inputs. The register descriptions is in the family user guide, a great document which almost always answers all of my questions.
http://www.ti.com/litv/pdf/slau144f
Nice tutorial, too bad I found it after I struggled so much with my launchpad -.-
ReplyDeleteThe "using buttons" was very helpful too, it made me realize many things!
thanks
*bookmarks page*
(damn blogger deleted my longer post. grrrr)
ReplyDeleteI can't get the flashing/downloading/running part to work. I always get the error message:
------------------------
Failed to load program MSP-EXP430G2-Launchpad.out' on any of the targets.
Reason:
The target 'TI MSP430 USB1/MSP430' could not be found.
------------------------
So I (randomly) fiddelt around with the IAR WorbBench, and (although i did get some error warnings about hardware mismatches), it did seem to do something, and at the very least deleted the temperature-sensing demo program (although the blinking program isnt working, now). Thus, i'd guess that the Launchpad board is communicating in some form with the MSP.
Any pointers on how to get this (or anything at all!) to work with CCS? I really want to climb this admittedly steep learning curve, but can't even get over the first hurdle! :(
Hi, again!
ReplyDeleteI think there is something wrong with your instructions - at the very least maybe (!) incompatible with the new LaunchPad firmware.
I followed your instructions exactly, and got the error I described in my last post - but if I simply use the example project, without ANY modifications, and click on 'debug', after a while i get the error:
-------------------
MSP430: Error connecting to the target: The target setup (F20x2_G2x2x_G2x3x) does not match the actual target type (F20x1_G2x0x_G2x1x)
-------------------
....which i then 'ignore', and CCS happily flashes my MSP430. When I click on 'run', the leds start blinking again. The program doesn't seem to run, though (i guess because of that target mismatch).
If I use exactly the same project, and simply change the target from the pre-defined 'MSP430F2012' to the chip i am actually using (the G2211, in this case - but i also tried it with the 2231), i get the message mentioned in the other comment, again, an nothing works at all.
I did update the firmware of the launchpad before even starting to try all this, so maybe it has something to do with that.
Anyone?
Hey!
ReplyDeleteSomebody finally solved my problem:
http://www.43oh.com/forum/viewtopic.php?f=19&p=5115#p5115
(you have to, in contrast to the original instructions here, change the project's build properties)
Absolutely fantasic. Thank your for taking the time to write this up. I started with Arduino, and after leaning a little more about Computer Architectur and MIPS, I wanted to try my hand at a "real" microcontroller experience.
ReplyDeleteI was wondering if somebody knows if the emulator of the launchpasd can also be used for other MSP430 devices like the MSP430F5525 for example. Or is it hardcoded limited to the valueline series ?
ReplyDelete